Category Archives: personal

Photography Instincts: Water Droplets Captured My Way (Part 2)

Last time it rained here in Delhi, it turned out to be a stormy night followed by an equally rain-laden day.

But little did I know that the storm would leave behind a beautiful and serene picture.

It took me barely five steps outside my home to feel the petrichor and witness the lushness of freshly washed and perfectly clean leaves right after the rains in my small garden. And here by garden I mean a collection of plants in some thirty odd earthen pots which is the only way to add some beauty and fresh air to our lives in a multi-storeyed establishment. 🙂

Amid all this view of nature’s beauty, my eyes fell on the sole leaf of a plant that carefully balanced rain drops on its shiny surface.

Delicate and picturesquely beautiful is all I could describe the view to be, a picture of fine balance that could be ruined by the stroke of a feather or the lightest blow of the wind.

As for my camera that is usually stocked in one corner, low on charge and dust bearing these days, an instinct on my part to click a photograph or two charges its batteries almost magically.

Therefore, without any further delay I photographed this absolute beauty painted by the Rain Gods before it vanished and left me with just another leaf on just another plant in my home garden.

Leaf 1

Rain Drops on a Leaf

Isn’t this beautiful!!

It seems that ‘A Homemaker’s World’ just got a little bigger, spreading its wings beyond the four walls of the home and kitchen from where my previous posts on Water Droplets Captured My Way were published.

Have a Happy Time Photographing and Expressing!! 🙂

Art and Emotions in One Frame

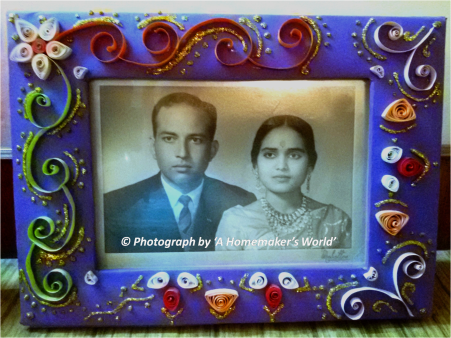
A few days back, when I was busy completing yet another craft project, my mom came up to me and stretched out her hand to give me something and said, ‘Can you make something for this?’ On realizing what she was handing over to me, my eyes welled up with tears. It was mom and dad’s first photograph after marriage.

They had kept it preserved since 1965 and gleefully narrated the day they had gone to get the picture clicked at a famous studio in Connaught Place, Delhi (India). A few days after their wedding mom and dad went to get their first professionally clicked photograph as a couple. On that day, dad adorned his favorite black suit and mom wore a pretty orange sari, along with her wedding jewelry. I love this photograph of mom and dad and till date we tell mom that they made for the most charming couple we have ever seen.

After we had refurnished the house some years back, the photograph had been taken off the photo frame and kept safely in a plastic wrap to make space for new show pieces and other family photos.

Ever since we lost dad a few years back, mom had very rarely mentioned to us about dad and how much she missed her life partner. That day when mom handed me the photograph felt as if she was asking me to help her revive and relive her long forgotten moments and feel dad’s presence in her life.

I could not have let go of a chance to get some positive vibes to mom’s life and especially when she was the one keen on that. That’s when I decided to make a photo frame for the picture, rather than purchasing one.

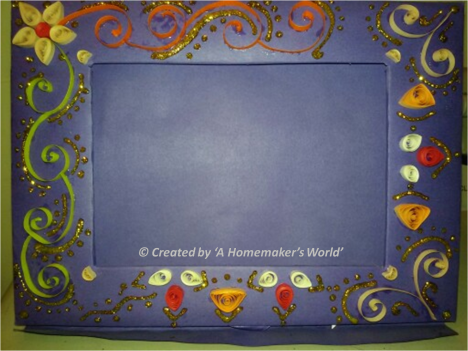
Some online tutorials and my creativity helped me create a lovely cardboard photo frame to fit my favorite photograph. I added to its beauty by using quilling art and some Fevicryl Golden Glitter Glue to decorate it.

PhotoFrame.png

I was the most satisfied when the best feedback for the picture frame came from mom when she said, ‘tune to char chand laga diye humari photo par’ (An idiom used in Hindi to tell that a thing looks prettier that before).

The Photo in its frame sits beautifully on a showcase in the living room of my house and usually gets an appreciative notice from the guests.

PhotoFramewithpic.png

Hope you like this.

First 500 Likes!

Screenshot_2016-07-18-17-50-29-1

Its just been a little under two months when I published my first post on ‘A Homemaker’s World’ and I proudly mention the first 500 likes on my blog.

Thank you all for appreciating and encouraging me with your compliments every time I post on the blog.

This means a lot to me and will definitely take my zest for writing more interesting posts and articles one step ahead.

Hugs!!

Photography Instincts: Melting Ice

This is the photograph of ‘frozen water’, which I captured almost three years back. This is ice in a metal container, just starting to melt at the sides. The melt down created arrays of air bubbles, a visual treat that urged me to capture this moment.

DSC_0018

Melting Ice

It felt as though the tiny air bubbles were waiting for the ice above them to melt away and be liberated to be a part of the fresh air all around.

Whenever I sit alone, trying to find some ‘me’ time, I find it relaxing to go through photos and albums, new and old. And this photograph of ‘Melting Ice’ always gathers my attention. It makes me stop and think. It brings two perspectives about life and relationships to my mind, and I must confess that my frame of thoughts and mood play a vital role in forming these perspectives.

After having gone through a difficult moment in life or in relationships, the ‘frozen’ water appears to me as hard feelings that the bitter moments leave behind and the bubbles appear as the daggers of regret, piercing through the hard of these feelings, making it even more painful to bear the moment.

Not at all positive, I know. This is just the first of the two perspectives though! 🙂

When I revisit this picture after a few hours or days, my mind and heart give way to the second perspective, an altogether new meaning to the pic.

This time I see the warmth of the air around the frozen water, helping the ice to melt and the bubbles to be freed , just like the warmth of strong relationships that flourish on the hope that the ice of hard feelings will melt away and the bubbles of bottled up emotions and regret will be freed.

Finally, we are just left with water, so transparent and moldable, a fine example and a wonderful basis for any healthy relationship.

Hope you like this.

Icing on the Cake, Literally!!

Hi there!

This is in continuation to my post yesterday, wherein I shared the recipe for making an Eggless Chocolate Cake and all my hard work paid off when the resulting cake was fabulously fluffed and spongy.

The whiff in the air that a freshly baked cake leaves is absolutely irresistible. I just always want to cut the warm cake into slices, put some Hershey’s chocolate sauce and roasted nuts and eat it to get that melt-in-the-mouth feeling….mmmmm..:)

But, I had different plans that required the entire cake to be ‘saved’ and put aside to be cooled down. Then I started making the frosting for the cake.

As some of us were discussing yesterday, patience is the key to the frosting part, be it waiting for the cake to cool down to giving the final touches while icing the cake (an attempt to make a neatly wrapped delicious looking cake :)).

Usually I use a chocolate butter cream frosting for all my cakes because everyone at my home loves chocolate like mad ;). But this time I wished to make a contrasting frosting, as in white on chocolate brown, to make it look visually more appealing. I personally love the look of the white vanilla frosting placed neatly in the layers of the chocolate cake when sliced. 🙂

The final look of my vanilla butter cream frosting wrapped eggless chocolate cake (wow…sounds to tempting) is here for you. After wrapping this cake in the frosting, I dusted some grated Dairy Milk Chocolate on the top and sides of the cake and then to give a little colour to the too plain look of the cake, I decorated it with some Cadbury Gems on the circumference.

20151231_133803

Vanilla Buttercream Frosting on Eggless Chocolate Cake

20151231_133753

Vanilla Buttercream Frosting on Eggless Chocolate Cake

And for those of you who wished to see the sponginess of the cake from the inside, here’s the pic of the sliced cake. The contrasting frosting sits pretty in between the layers, making me happy with the final outcome.

20160101_000258

Yummy….Lip smacking 😉

Hope you like this.

For more visit my page Cakes with a Green Dot

You can also follow me on Pinterest and Twitter

Ocean Stone Painting: Creativity and Beyond

My love for experimenting with colors took a new path when I decided to do some pebble painting. Here in Delhi, it’s easier to find piles of bricks ready to build huge bungalows and mansions, but finding one pebble is quite an impossible task.

My eyes kept searching at various places for those oval pebbles, which could be painted and set around that Ganesha idol in my living room, further enhancing the beauty of the idol of the Lord of new beginnings. That was the idea I initially had for my living room decor.

Unfortunately or fortunately, I could not find the desired pebbles and rather on searching around the garden area of my own house I found hidden treasures from my father’s gardening days. These were some relatively big, beautiful, oval shaped ocean stones, which dad had collected especially for decorating around the earthen flower pots in our house. How had I not seen them till now!

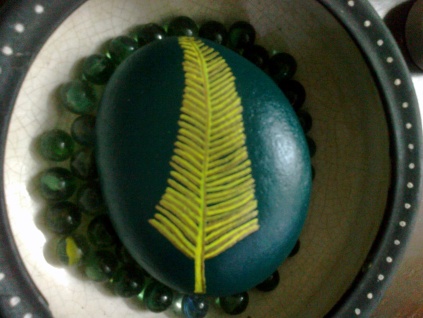
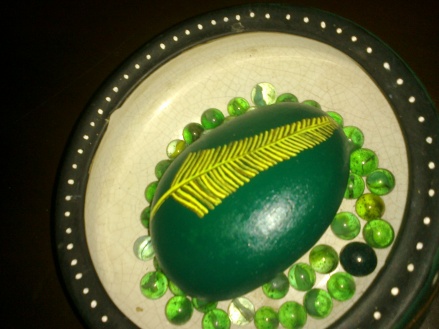
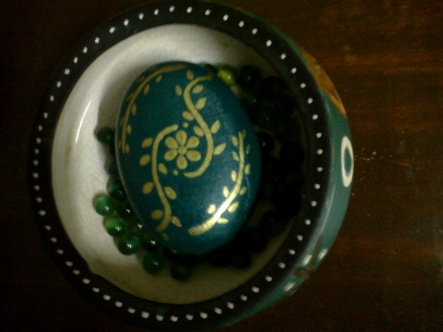
Perfect for making a beautiful centerpiece for a table, I painted one of the stones all green. On that, I painted a beautiful feather in yellow outlined with golden paint on one side and a simple abstract design in gold on the other. This made it a perfect, reversible centerpiece for the lobby table.

Feather painted on stone

Painted Ocean Stone

I placed the stone in a flat China vase and surrounded it with green marbles.

painted stone in china pot

Painted Stone as a Centerpiece in Flat China Vase Surrounded with Green Marbles

reverse of the stone

Reverse of the Ocean Stone Painted with Abstract Design

The painted stone at the center of the house signifies strong foundation and stability, while the green marble spheres are a symbol of constant movement and entry of positive energy in the house. The color green itself signifies hope, harmony and good atmosphere around the house.

So much said, I found a way to display my talent and make a lovely decorative piece for my home. It came at a precious price of patience and creativity added up together. 🙂

Hope you like this.

Want Some Buttermilk aka Neer Mor?

Delhi is scorching under the June sun and the blistering heat is taking away all the zest for life it seems…phewwww!!! And if this wasn’t enough, the daily chores bore you out.

But cooking yummy food never fails to reinvigorate my soul to keep going. So today’s lunch menu was all South Indian, and I just relish this cuisine to the core. That’s one reason South Indian dishes topped my list when I chose to start honing my culinary skills.

And today, just when I was about to finish preparing lunch, my need to quench my thirst made my mind run through a list of cold summer drinks that I could immediately make. With South Indian food on my mind, what better than a glass of BUTTERMILK. “Mmmmm….Yummy Choice”, my brain said and I got down to making the quick and easy buttermilk, one drink that would make your gut say ‘Thank You!’ after a heavy meal.

Buttermilk.jpg

Buttermilk is also know by the names of ‘Chhach’, ‘Lassi’, ‘Chaas’, ‘Mattha’, ‘Neer Mor’, etc. all over India.

This summer special drink not only lower’s the body heat, it is an excellent probiotic, great for lactose-intolerant people (as it is made of curd), brilliant for digestion, and packed with nutritional value.

I made the South Indian style Buttermilk, which is a spicy-salty blend of curd, water, green chillis, ginger, curry leaves, coriander powder, black salt and a hint of asafoetida. A tempering of mustard seeds (Rai/Sarson), asafoetida and curry leaves enhances the flavour of Buttermilk aka Neer Mor in South India.

Do try this on a hot summer afternoon and I bet you will relish every sip of it.

Its Gujarati Farsaan Time at Home-Sumptuous Khandvi

20160601_140726.jpg

Okay, so its one of those phases when I decide to make something new and interesting in my kitchen every other day.

I chose to make a Gujarati farsaan (Read: Gujarati snack) called Khandvi for the evening.

It is one delectable snack with that sweet and salty flavour characteristic to Gujarati food, topped with the softness of mini rolls and garnished with freshly grated coconut. This is a non-fried snack and is tongue tempting to the core.

My sister, a big foodie and fan of my cooking, is sitting with all eyes on the kitchen entrance, where I carefully lay each Khandvi roll on the platter, ready for the coconut garnish finale. On the other hand, my mom, also with her eyes set on the kitchen door; but not getting the complete view of the culinary corner of the house; is petrified and curious to know the mess that I might have made of the whole experiment.

Finally, I emerge from the kitchen to present one of the most enticing snacks I have ever made. And what I receive in return is two bright faces, one ready for the Gujarati treat and the other happy for her daughter adding another dish to her culinary skills, a piece of ‘essential’ information that would eventually go on that matrimonial website.

Anyways, since Khandvi is a snack best had in evenings, I put the platter in refrigerator to be had later with tomato ketchup and/or mint chutney!!

Mmmmm….Lip smacking, isn’t it!

Okay don’t be jealous, here’s the recipe for you. Make it at home and tell me how it turned out.

Recipe for Making Khandvi

Ingredients

For Khandvi Mixture

  1. 1 cup besan (Bengal gram flour)
  2. 1 cup curd (yoghurt)
  3. 1 cup water
  4. A pinch of hing (Asafoetida)
  5. Few drops of lemon juice
  6. 1/4 tsp Haldi powder (Turmeric)
  7. 2 tsp of chilli-ginger paste
  8. Salt to Taste
  9. 1 ½ to 2 tsp Sugar
  10. Oil for Greasing

For the Tempering

  1. 2 tsp Oil
  2. 1 tsp Rai/Sarson seeds (Mustard)
  3. 1 tsp Safed Til (Sesame seeds)
  4. 1/4 tsp Hing (Asafoetida)

Method

  1. Grease 3 thalis (steel plates) of 10” diameter each with oil on both sides and keep aside
  2. Combine all ingredients of Khandvi mix and whisk well to avoid lumps and form a smooth mix
  3. Switch on the flame of the pan and cook for 10 minutes (Approx.) and keep stirring continuously
  4. Spread a spoonful of the batter on greased thali, wait for few seconds, if it starts rolling the mix is ready to spread, else cook for few more minutes
  5. While the mixture is still hot, spread the mix to form a thin layered spread on all three thalis separately using a flat spoon
  6. Allow to cool for 5 to 10 minutes, make approx. 5 slits across the thali with a knife and roll them tightly into mini rolls
  7. For the tempering, heat oil in a pan and add mustard seeds and asafoetida and sauté
  8. Add sesame seeds and let them crackle
  9. Pour the tempering on the plated khandvis evenly
  10. Garnish with freshly grated coconut and coriander

The Khandvis are ready to be served with Ketchup and mint chutney.

Do try and share how you found these!

Its just the beginning

Hi there, all you homemakers, glad to have you here!

So here I am; after all these years of running around for studies, corporate life, challenges of the personal life; taking an altogether different route to connect back with my long lost friends, family, make new friends and share loads of stuff that forms an integral part of a homemaker’s life.

This is a platform for all the working/non-working, married/single women to share their thoughts, experiences, expertise and hobbies, speak their hearts out, share their daily challenges and their ways of dealing with them.

Check this space for cooking, home décor, fashion, beauty, DIY projects and much more. And not to forget sharing lots of personal daily life experiences, funny or emotional, with all you readers out there.