Tag Archives: cooking

First 500 Likes!

Screenshot_2016-07-18-17-50-29-1

Its just been a little under two months when I published my first post on ‘A Homemaker’s World’ and I proudly mention the first 500 likes on my blog.

Thank you all for appreciating and encouraging me with your compliments every time I post on the blog.

This means a lot to me and will definitely take my zest for writing more interesting posts and articles one step ahead.

Hugs!!

Refurbishing Food: Crispy Cutlets

How many times do we come across a situation when there was a party the previous night and we cooked for 10 people when there were only 7- 8 or the kids ordered their favourite pizza and the dishes for dinner went straight into the refrigerator.

Food wastage is so not acceptable to me and therefore I keep experimenting with leftover food, to convert it into something different from what it originally was.

One such refurbished snack I make is cutlets from leftover dals (cooked lentils/pulses), especially the red lentil whole (Masoor Sabut dal). These cutlets are made with dal and bread as the base, along with a whole lot of spices to not just enhance the flavour, but to make sure the leftover dal from last night does not wreak havoc on the stomach. 🙂

Ingredients:

  • 1 cup pre-cooked dal (preferable red lentil whole)
  • 1 pack of white bread (whole wheat bread works well too)
  • 1-2 tsp of garlic paste
  • 1 tsp of ginger paste
  • 4-5 chopped green chillies
  • ½ tsp cinnamon powder
  • ½ tsp Carom seeds (Ajwain)
  • ¼ tsp Asafoetida (Hing)
  • 1 tsp coriander powder
  • ½ tsp Dried Mango Powder (Amchoor)
  • ¼ tsp crushed pomegranate seeds (Anardana)
  • ½ tsp of Garam Masala (Mix of various Indian spices)
  • Salt to taste
  • Bread crumbs for coating the cutlets
  • Oil for deep frying (can be shallow fried as per requirement)

Method:

  • Combine the precooked dal and bread to make a dough like mixture and let the bread soak for 30 minutes. If the mixture appears soggy/watery, add a few more slices of bread
  • Add the ginger and garlic pastes, spices and salt to taste. Remember that this is a precooked dal, therefore it already has good amounts of salt in it.
  • Take small portions of the mix to form round or oval shaped cutlets
  • Roll the cutlet in bread crumbs and make sure that it is covered with crumbs on all sides
  • Repeat the same procedure for the rest of the cutlets
  • Keep the cutlets in the refrigerator for 10-15 minutes to allow the cutlets to bind better and crumbs to get moistened
20160608_115814

Bread and Cooked Lentil Cutlets Ready for Frying

  • Heat oil in a wok and put 5-6 cutlets at a time for deep frying on a low-medium flame
  • Once the cutlets turn golden brown, remove from the wok and drain excess oil on an absorbent paper
  • Repeat the same for the rest of the cutlets
  • Serve hot with tomato ketchup and mint chutney. You can also sprinkle chaat masala (mix of black salt, chilli powder, cumin seeds and dry mango powder) for extra tangy taste
Cutlets

Crispy Cutlets Served Hot with Potato Chips and Tomato Ketchup

Hope you like this. Do share your views on the same.

Icing on the Cake, Literally!!

Hi there!

This is in continuation to my post yesterday, wherein I shared the recipe for making an Eggless Chocolate Cake and all my hard work paid off when the resulting cake was fabulously fluffed and spongy.

The whiff in the air that a freshly baked cake leaves is absolutely irresistible. I just always want to cut the warm cake into slices, put some Hershey’s chocolate sauce and roasted nuts and eat it to get that melt-in-the-mouth feeling….mmmmm..:)

But, I had different plans that required the entire cake to be ‘saved’ and put aside to be cooled down. Then I started making the frosting for the cake.

As some of us were discussing yesterday, patience is the key to the frosting part, be it waiting for the cake to cool down to giving the final touches while icing the cake (an attempt to make a neatly wrapped delicious looking cake :)).

Usually I use a chocolate butter cream frosting for all my cakes because everyone at my home loves chocolate like mad ;). But this time I wished to make a contrasting frosting, as in white on chocolate brown, to make it look visually more appealing. I personally love the look of the white vanilla frosting placed neatly in the layers of the chocolate cake when sliced. 🙂

The final look of my vanilla butter cream frosting wrapped eggless chocolate cake (wow…sounds to tempting) is here for you. After wrapping this cake in the frosting, I dusted some grated Dairy Milk Chocolate on the top and sides of the cake and then to give a little colour to the too plain look of the cake, I decorated it with some Cadbury Gems on the circumference.

20151231_133803

Vanilla Buttercream Frosting on Eggless Chocolate Cake

20151231_133753

Vanilla Buttercream Frosting on Eggless Chocolate Cake

And for those of you who wished to see the sponginess of the cake from the inside, here’s the pic of the sliced cake. The contrasting frosting sits pretty in between the layers, making me happy with the final outcome.

20160101_000258

Yummy….Lip smacking 😉

Hope you like this.

For more visit my page Cakes with a Green Dot

You can also follow me on Pinterest and Twitter

Cakes with a Green Dot: Chocolate Cake

My love for baking cakes keeps growing and I desperately wait for the next birthday or another celebratory day in my family, when I can bake my next cake.

I personally believe that eggless cakes when compared with the egg based ones are spongier, rise higher, and are absolutely scrumptious. My family drools over the cakes I bake, so I have lots of testimony vouching for Cakes with a Green Dot. 🙂

Today I am going to share with you my recipe for a basic eggless chocolate cake.

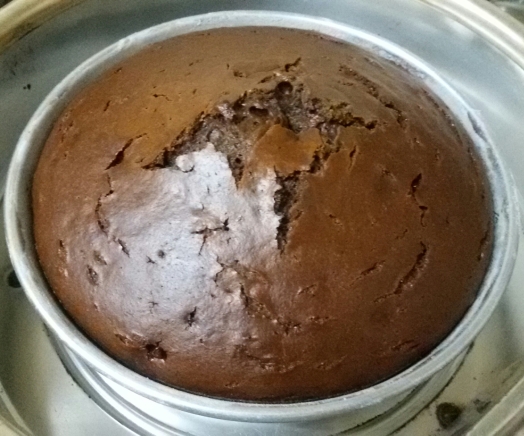
20151230_182651-1

Freshly Baked Chocolate Cake: Fabulously Risen, Spongy and Smells of Chocolate and Vanilla All Around

Ingredients:

  • 1 tin condensed milk
  • 2 ½ cups plain flour
  • ½ tsp baking powder
  • 1 tsp baking soda
  • ½ or ¼ cup vegetable oil
  • 1 tsp vanilla extract
  • 1 cup warm water
  • 1-2 tbsp sugar
  • 1 heaped tbsp cocoa powder
  • Pinch of salt

Initial Preparations:

  • Warm Water in a Vessel
  • Grease the baking tin and dust with plain flour
  • Preheat the oven at 180⁰ C

Method:

  • Put condensed milk, oil, sugar and vanilla essence in a pan
  • Mix/blend the ingredients to ensure all the ingredients are combined well
  • Sieve a mix of plain flour, baking powder, baking soda, and cocoa powder a few times, to ensure all the dry ingredients are mixed well
  • Slowly put the dry ingredients in the condensed milk, sugar, oil and vanilla mix
  • Add a tbsp of warm water to allow the mixture to blend well
  • Use the conventional cut and fold method to ensure creation of vacuum in the batter
  • Add a pinch of salt and mix again
  • Pour the batter in the dusted tin pan and place in the preheated oven
  • This cake takes around 45 mins to 1 hour to bake
  • Insert a toothpick or knife to check, if it comes out completely clean the cake is baked. If not, bake for 5-10 more mins

The cake is ready. Let it cool in order to proceed to the icing part. 🙂

Satiating Snacks: Baby Corn Fritters with Creamy Cheese Dip

Be it evening hunger pangs or those friends coming over, quick and easy, yet light and lip smacking snacks/starters are the ones I always look for.

This time I tried a simple recipe of baby corn fritters, which came out to be marvelously crispy and juicy, and I found them to be a wholesome snack for a high tea or as a starter.

These fritters are made by dipping the blanched baby corns in a mix of plain flour, curd, garlic, salt, black pepper and chili flakes, followed by deep frying them until golden brown. These can be served with the condiments of your choice, be it tomato ketchup, mint chutney, chili garlic sauce or cheese dip. I used the easy recipe for creamy cheese dip. Click on the link for the recipe of creamy cheese dip.

Baby Corn Fritters

Ingredients:

  • 1 cup baby corns (blanched and cut into halves for easy of frying and serving)
  • ½ cup plain flour
  • 1 tbsp cornflour
  • 2 tbsp curd
  • ¼ tsp chilli powder
  • 1 tsp garlic paste
  • Salt to taste
  • Oil for deep frying

Method:

  • Combine all ingredients in a bowl and add ½ cup of water and mix well to make a batter of thick consistency
  • Dip each baby corn in the batter and deep fry a few at a time, till golden brown
  • Drain on an absorbent paper
  • Serve hot with tomato ketchup, mint chutney, chili garlic sauce or cheese dip

Happy snacking!

Its Gujarati Farsaan Time at Home-Sumptuous Khandvi

20160601_140726.jpg

Okay, so its one of those phases when I decide to make something new and interesting in my kitchen every other day.

I chose to make a Gujarati farsaan (Read: Gujarati snack) called Khandvi for the evening.

It is one delectable snack with that sweet and salty flavour characteristic to Gujarati food, topped with the softness of mini rolls and garnished with freshly grated coconut. This is a non-fried snack and is tongue tempting to the core.

My sister, a big foodie and fan of my cooking, is sitting with all eyes on the kitchen entrance, where I carefully lay each Khandvi roll on the platter, ready for the coconut garnish finale. On the other hand, my mom, also with her eyes set on the kitchen door; but not getting the complete view of the culinary corner of the house; is petrified and curious to know the mess that I might have made of the whole experiment.

Finally, I emerge from the kitchen to present one of the most enticing snacks I have ever made. And what I receive in return is two bright faces, one ready for the Gujarati treat and the other happy for her daughter adding another dish to her culinary skills, a piece of ‘essential’ information that would eventually go on that matrimonial website.

Anyways, since Khandvi is a snack best had in evenings, I put the platter in refrigerator to be had later with tomato ketchup and/or mint chutney!!

Mmmmm….Lip smacking, isn’t it!

Okay don’t be jealous, here’s the recipe for you. Make it at home and tell me how it turned out.

Recipe for Making Khandvi

Ingredients

For Khandvi Mixture

  1. 1 cup besan (Bengal gram flour)
  2. 1 cup curd (yoghurt)
  3. 1 cup water
  4. A pinch of hing (Asafoetida)
  5. Few drops of lemon juice
  6. 1/4 tsp Haldi powder (Turmeric)
  7. 2 tsp of chilli-ginger paste
  8. Salt to Taste
  9. 1 ½ to 2 tsp Sugar
  10. Oil for Greasing

For the Tempering

  1. 2 tsp Oil
  2. 1 tsp Rai/Sarson seeds (Mustard)
  3. 1 tsp Safed Til (Sesame seeds)
  4. 1/4 tsp Hing (Asafoetida)

Method

  1. Grease 3 thalis (steel plates) of 10” diameter each with oil on both sides and keep aside
  2. Combine all ingredients of Khandvi mix and whisk well to avoid lumps and form a smooth mix
  3. Switch on the flame of the pan and cook for 10 minutes (Approx.) and keep stirring continuously
  4. Spread a spoonful of the batter on greased thali, wait for few seconds, if it starts rolling the mix is ready to spread, else cook for few more minutes
  5. While the mixture is still hot, spread the mix to form a thin layered spread on all three thalis separately using a flat spoon
  6. Allow to cool for 5 to 10 minutes, make approx. 5 slits across the thali with a knife and roll them tightly into mini rolls
  7. For the tempering, heat oil in a pan and add mustard seeds and asafoetida and sauté
  8. Add sesame seeds and let them crackle
  9. Pour the tempering on the plated khandvis evenly
  10. Garnish with freshly grated coconut and coriander

The Khandvis are ready to be served with Ketchup and mint chutney.

Do try and share how you found these!

Its just the beginning

Hi there, all you homemakers, glad to have you here!

So here I am; after all these years of running around for studies, corporate life, challenges of the personal life; taking an altogether different route to connect back with my long lost friends, family, make new friends and share loads of stuff that forms an integral part of a homemaker’s life.

This is a platform for all the working/non-working, married/single women to share their thoughts, experiences, expertise and hobbies, speak their hearts out, share their daily challenges and their ways of dealing with them.

Check this space for cooking, home décor, fashion, beauty, DIY projects and much more. And not to forget sharing lots of personal daily life experiences, funny or emotional, with all you readers out there.