Tag Archives: Food

Dessert Desires: Choco-Nut Fudge Balls

Hi friends, it’s great to be back after a break, writing for my very own space yet again.

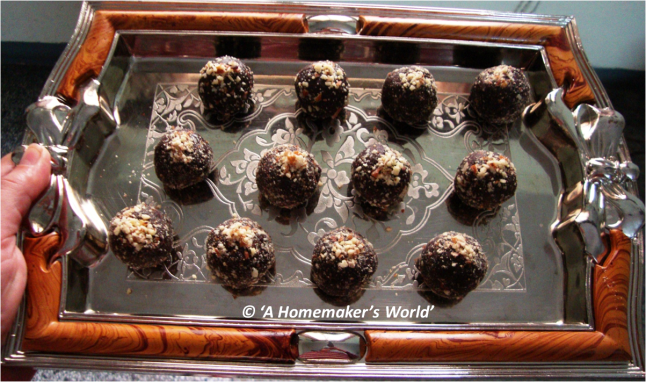
This time I tried making this super quick and easy, and absolutely to-drool-over kind of dessert, the chewy and gooey choco-nut fudge balls.

My personal take on the fudge balls is that when these are had within hours of making, the texture is soft and chewy on the outside and crispy from the nuts inside. When stored for a couple of days, these taste no less than some exotic chocolates because the chewiness of the condensed milk is taken over by the crispness of a yummy nutty milk chocolate. 🙂

Choconutfudgeballs2.png

It’s definitely a chocolaty treat for the kids, but age is just a number when it comes to the love for chocolate. 😉

Since these turned out absolutely delish, I wish to share the recipe with you all.

Choconutfudgeballs3.png

Ingredients:

  • ½ cup – Condensed Milk
  • 2 tbsp – Cocoa Powder
  • ¼ cup – Butter
  • 1 tbsp – Powdered Sugar (as per taste/optional as sweetness from condensed milk is sufficient)
  • ½ tsp – Vanilla Extract
  • ½ cup – Chopped Almonds and Walnuts (can be roasted for extra crispness)
  • 1 tbsp – Crushed and Roasted Almonds (for coating on the balls)

Method:

  • Heat a non-stick pan and add butter and condensed milk to it and mix well
  • Add cocoa powder, vanilla extract and powdered sugar
  • Cook the mixture on a low-medium flame for about 4-5 minutes
  • Keep stirring continuously until the mixture thickens and starts to leave the sides of the pan
  • Remove from flame, add the nuts and mix well
  • Let the fudge cool down for about ½ hour
  • Once cooled, make balls of equal size (This recipe makes 12-14 balls)
  • Roll each of the balls in the crushed roasted almonds

The Choco-Nut Fudge Balls are ready to eat immediately for the chewy-chocolaty feel, and best stored for 2-3 days for the exotic chocolate texture.

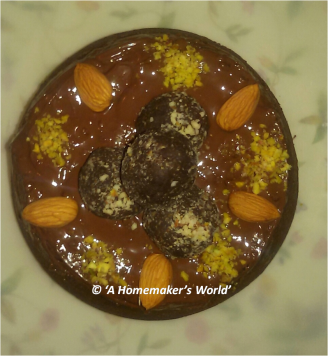
Hey, I even found these fudge balls perfect to decorate a Nutella Swirl Cake I recently made. The cake looked gorgeous! 🙂

choconutfudgeballs4

Hope you and your kids enjoy having these fudge balls.

Dessert Desires: Mango Fudge

What to do when you have some ripening mangoes. I decided to try something new this time and started to look out for a recipe. I crossed my fingers that hopefully my search leads me to a recipe that goes straight into my recipe book as one of the all time favourites.

Also, while trying out a new recipe, Mom’s instructions on how to be careful with food and how not to waste food keep doing rounds in my mind. These instructions are very valid and I make sure to take them really seriously. I don’t know why I mention this amid the excitement of trying to cook something new, but probably the jitters of a new dessert making experiment and the thought that I might fail at it, lead me to keep revising this in my mind. 🙂

Okay, so I finally found and successfully made a dessert out of the over ripe mangoes. This actually turned out to be an extremely easy and interesting Indian sweet, the Mango Fudge (Read: Aam ka Kalakand).

Mango Kalakand 1.png

Mango Fudge Set for Cutting into Desired Shape After Cooling

Time to confess, I am a big fan of Kalakands and milk cakes. And for me to have made some myself, with complete justice done to those ripening mangoes was like icing on the cake.

Mango Kalakand 2.png

Aam ka Kalakand aka Mango Fudge

Here’s the recipe if you wish to try making this as well.

Ingredients:

  • 1 ltr Milk
  • 2 Cups Mango Pulp (without threads, so prefer to sieve the pulp before adding to the milk)
  • 2 tbsps of Yoghurt
  • 1 Cup Sugar (Alter quantity as per taste)
  • ½ tsp Cardamon Powder
  • Some Saffron Strands

For setting:

  • Lightly greased deep plate/aluminium tin

For Garnish:

  • Roasted/Unroasted Nuts (Almonds/Cashew/Pistachios)

Method:

  • Boil milk in a thick based pan
  • Add mango pulp and yoghurt
  • Keep stirring gently and allow the milk to curdle
  • Continue to stir and allow the liquid to evaporate and to avoid sticking at the base
  • Once the liquid evaporates, add sugar and mix gently to allow the sugar to melt
  • After the sugar has melted completely, you can see the dessert starts looking granular
  • Add the cardamom powder and saffron strands for flavour
  • Allow the mix to cool and transfer it in a slightly deep plate or tin
  • Garnish with nuts. I used almonds
  • Refrigerate for 30 minutes to allow the fudge to set completely
  • Once set, cut the fudge into the desired shapes and serve

Handy Tips:

  • If the milk doesn’t curdle even after adding the mentioned quantity of curd and mango, add 2 tbsp more of curd to facilitate curdling
  • The step of making the liquid after curdling to evaporate completely takes the maximum amount of time (about 30-40 minutes), so be patient 🙂
  • The granular look of the thickened milk after adding sugar is exactly what is desired for that perfect kalakand, ready to be taken off flame and set to cool

The sweet-tangy taste of the mango and the chewiness of the fudge makes it a drool worthy sweet/dessert.

Do try making this for your loved ones!

First 500 Likes!

Screenshot_2016-07-18-17-50-29-1

Its just been a little under two months when I published my first post on ‘A Homemaker’s World’ and I proudly mention the first 500 likes on my blog.

Thank you all for appreciating and encouraging me with your compliments every time I post on the blog.

This means a lot to me and will definitely take my zest for writing more interesting posts and articles one step ahead.

Hugs!!

When You Don’t Wish to Bake, Try this Biscuit Cake!

There are so many times when the whole process of baking a cake can feel so lengthy and tedious. Even when some guests are coming over lunch or dinner at a short notice, we are usually on the lookout for desserts that are quick to make and scrumptious at the same time.

So if you wish to make an easy, quick, delectable, chocolaty cake, without getting into the hassle of baking, do try the super easy biscuit cake.

When I tried this for the first time, it took me just 10 minutes to make the cake mix. After setting it in the refrigerator for a couple of hours, the biscuit cake was ready to be served.

I would personally recommend this to all chocolate cake lovers. My family swoons over the idea of having a biscuit cake, especially on a summer afternoon when a cold and chocolaty dessert feels like heaven on earth.

20160705_145402

Yummy, Gooey and Chocolaty No Bake Biscuit Cake

Do try making it for your family and friends as well. It’s so easy, even your kids can make this no bake cake. Here’s the recipe:

Ingredients:

  • 1 cup milk
  • 2 tbsp cocoa powder/2-3 cubes of chocolate
  • 2 tbsp of vegetable oil/2 cubes of butter
  • 2 packets of Marie biscuits/Cracker biscuits
  • 3-4 tbsp sugar
  • 1 tsp Vanilla Essence
  • Dry fruits (roasted/non-roasted)

For setting the cake:

  • Cling Wrap
  • Tray/Aluminium Container (can be used alternately as cake setting bases)

Method:

  • Put oil/butter, vanilla essence and sugar in a bowl and mix well
  • Heat the milk slightly and add chocolate. Allow the chocolate to melt in case using chocolate cubes
  • Pour the milk and chocolate mix over the oil/butter, vanilla essence and sugar mixture. Mix well
  • Add crushed biscuits and keep turning the mixture so that all the mixture gets absorbed by the biscuits
  • Keep adding biscuits until you get a thick mixture
  • Add the dry fruits to the mix. I used roasted cashews, almonds and pistachios
  • Now place a cling wrap on the kitchen counter and transfer the cake mix on it
  • Wrap in a shape you wish to set the cake in (round, square or oval)
  • After wrapping in the cling film I place the cake in a 5” round cake container to get the perfect round cake shape
    • You can even directly place the cling wrapped cake on a tray
  • Set in the refrigerator for 1.5 to 2 hrs

Tip: Some people love the crispiness of the biscuits in the cake, while some do not. For those who love the crispiness, 2 hrs setting time is enough. For those who like their cake all soft and gooey, refrigerate the cake overnight, the biscuits will absorb more moisture and become softer.

Hope you will try making and enjoy having this no bake cake. 🙂

Refurbishing Food: Crispy Cutlets

How many times do we come across a situation when there was a party the previous night and we cooked for 10 people when there were only 7- 8 or the kids ordered their favourite pizza and the dishes for dinner went straight into the refrigerator.

Food wastage is so not acceptable to me and therefore I keep experimenting with leftover food, to convert it into something different from what it originally was.

One such refurbished snack I make is cutlets from leftover dals (cooked lentils/pulses), especially the red lentil whole (Masoor Sabut dal). These cutlets are made with dal and bread as the base, along with a whole lot of spices to not just enhance the flavour, but to make sure the leftover dal from last night does not wreak havoc on the stomach. 🙂

Ingredients:

  • 1 cup pre-cooked dal (preferable red lentil whole)
  • 1 pack of white bread (whole wheat bread works well too)
  • 1-2 tsp of garlic paste
  • 1 tsp of ginger paste
  • 4-5 chopped green chillies
  • ½ tsp cinnamon powder
  • ½ tsp Carom seeds (Ajwain)
  • ¼ tsp Asafoetida (Hing)
  • 1 tsp coriander powder
  • ½ tsp Dried Mango Powder (Amchoor)
  • ¼ tsp crushed pomegranate seeds (Anardana)
  • ½ tsp of Garam Masala (Mix of various Indian spices)
  • Salt to taste
  • Bread crumbs for coating the cutlets
  • Oil for deep frying (can be shallow fried as per requirement)

Method:

  • Combine the precooked dal and bread to make a dough like mixture and let the bread soak for 30 minutes. If the mixture appears soggy/watery, add a few more slices of bread
  • Add the ginger and garlic pastes, spices and salt to taste. Remember that this is a precooked dal, therefore it already has good amounts of salt in it.
  • Take small portions of the mix to form round or oval shaped cutlets
  • Roll the cutlet in bread crumbs and make sure that it is covered with crumbs on all sides
  • Repeat the same procedure for the rest of the cutlets
  • Keep the cutlets in the refrigerator for 10-15 minutes to allow the cutlets to bind better and crumbs to get moistened
20160608_115814

Bread and Cooked Lentil Cutlets Ready for Frying

  • Heat oil in a wok and put 5-6 cutlets at a time for deep frying on a low-medium flame
  • Once the cutlets turn golden brown, remove from the wok and drain excess oil on an absorbent paper
  • Repeat the same for the rest of the cutlets
  • Serve hot with tomato ketchup and mint chutney. You can also sprinkle chaat masala (mix of black salt, chilli powder, cumin seeds and dry mango powder) for extra tangy taste
Cutlets

Crispy Cutlets Served Hot with Potato Chips and Tomato Ketchup

Hope you like this. Do share your views on the same.

Icing on the Cake, Literally!!

Hi there!

This is in continuation to my post yesterday, wherein I shared the recipe for making an Eggless Chocolate Cake and all my hard work paid off when the resulting cake was fabulously fluffed and spongy.

The whiff in the air that a freshly baked cake leaves is absolutely irresistible. I just always want to cut the warm cake into slices, put some Hershey’s chocolate sauce and roasted nuts and eat it to get that melt-in-the-mouth feeling….mmmmm..:)

But, I had different plans that required the entire cake to be ‘saved’ and put aside to be cooled down. Then I started making the frosting for the cake.

As some of us were discussing yesterday, patience is the key to the frosting part, be it waiting for the cake to cool down to giving the final touches while icing the cake (an attempt to make a neatly wrapped delicious looking cake :)).

Usually I use a chocolate butter cream frosting for all my cakes because everyone at my home loves chocolate like mad ;). But this time I wished to make a contrasting frosting, as in white on chocolate brown, to make it look visually more appealing. I personally love the look of the white vanilla frosting placed neatly in the layers of the chocolate cake when sliced. 🙂

The final look of my vanilla butter cream frosting wrapped eggless chocolate cake (wow…sounds to tempting) is here for you. After wrapping this cake in the frosting, I dusted some grated Dairy Milk Chocolate on the top and sides of the cake and then to give a little colour to the too plain look of the cake, I decorated it with some Cadbury Gems on the circumference.

20151231_133803

Vanilla Buttercream Frosting on Eggless Chocolate Cake

20151231_133753

Vanilla Buttercream Frosting on Eggless Chocolate Cake

And for those of you who wished to see the sponginess of the cake from the inside, here’s the pic of the sliced cake. The contrasting frosting sits pretty in between the layers, making me happy with the final outcome.

20160101_000258

Yummy….Lip smacking 😉

Hope you like this.

For more visit my page Cakes with a Green Dot

You can also follow me on Pinterest and Twitter

Cakes with a Green Dot: Chocolate Cake

My love for baking cakes keeps growing and I desperately wait for the next birthday or another celebratory day in my family, when I can bake my next cake.

I personally believe that eggless cakes when compared with the egg based ones are spongier, rise higher, and are absolutely scrumptious. My family drools over the cakes I bake, so I have lots of testimony vouching for Cakes with a Green Dot. 🙂

Today I am going to share with you my recipe for a basic eggless chocolate cake.

20151230_182651-1

Freshly Baked Chocolate Cake: Fabulously Risen, Spongy and Smells of Chocolate and Vanilla All Around

Ingredients:

  • 1 tin condensed milk
  • 2 ½ cups plain flour
  • ½ tsp baking powder
  • 1 tsp baking soda
  • ½ or ¼ cup vegetable oil
  • 1 tsp vanilla extract
  • 1 cup warm water
  • 1-2 tbsp sugar
  • 1 heaped tbsp cocoa powder
  • Pinch of salt

Initial Preparations:

  • Warm Water in a Vessel
  • Grease the baking tin and dust with plain flour
  • Preheat the oven at 180⁰ C

Method:

  • Put condensed milk, oil, sugar and vanilla essence in a pan
  • Mix/blend the ingredients to ensure all the ingredients are combined well
  • Sieve a mix of plain flour, baking powder, baking soda, and cocoa powder a few times, to ensure all the dry ingredients are mixed well
  • Slowly put the dry ingredients in the condensed milk, sugar, oil and vanilla mix
  • Add a tbsp of warm water to allow the mixture to blend well
  • Use the conventional cut and fold method to ensure creation of vacuum in the batter
  • Add a pinch of salt and mix again
  • Pour the batter in the dusted tin pan and place in the preheated oven
  • This cake takes around 45 mins to 1 hour to bake
  • Insert a toothpick or knife to check, if it comes out completely clean the cake is baked. If not, bake for 5-10 more mins

The cake is ready. Let it cool in order to proceed to the icing part. 🙂

Creamy Cheesy Dip/Cheese Spread

Sauces and dips are so important to enhance the flavor of a dish. When making crispy snacks like nachos, wafers, fritters, garlic breads, etc., what better than a yummy creamy cheese.

It is quick and easy to make and serves the purpose of not only a condiment with snacks but a yummy spread to make those delectable grilled cheese sandwiches for breakfast.

Here’s the recipe:

Ingredients:

  • ½ cup milk
  • 4 cheese slices/3-4 cubes of cheese
  • 2 tbsp finely chopped capsicum
  • ½ tbsp cornflour
  • Black pepper powder and salt to taste

Method:

  • Combine all ingredients in a non-stick pan and cook for 4-5 minutes on low/medium flame or till the mixture thickens like a sauce
  • Let it cool. Refrigerate if requires, and serve with snacks

You can use the leftover cheese dip as a cheese spread to make a yummy grilled cheese sandwich and serve with tomato ketchup and chili garlic sauce.

20160612_113127

Grilled Sandwich Made from Leftover Cheese Dip

Satiating Snacks: Baby Corn Fritters with Creamy Cheese Dip

Be it evening hunger pangs or those friends coming over, quick and easy, yet light and lip smacking snacks/starters are the ones I always look for.

This time I tried a simple recipe of baby corn fritters, which came out to be marvelously crispy and juicy, and I found them to be a wholesome snack for a high tea or as a starter.

These fritters are made by dipping the blanched baby corns in a mix of plain flour, curd, garlic, salt, black pepper and chili flakes, followed by deep frying them until golden brown. These can be served with the condiments of your choice, be it tomato ketchup, mint chutney, chili garlic sauce or cheese dip. I used the easy recipe for creamy cheese dip. Click on the link for the recipe of creamy cheese dip.

Baby Corn Fritters

Ingredients:

  • 1 cup baby corns (blanched and cut into halves for easy of frying and serving)
  • ½ cup plain flour
  • 1 tbsp cornflour
  • 2 tbsp curd
  • ¼ tsp chilli powder
  • 1 tsp garlic paste
  • Salt to taste
  • Oil for deep frying

Method:

  • Combine all ingredients in a bowl and add ½ cup of water and mix well to make a batter of thick consistency
  • Dip each baby corn in the batter and deep fry a few at a time, till golden brown
  • Drain on an absorbent paper
  • Serve hot with tomato ketchup, mint chutney, chili garlic sauce or cheese dip

Happy snacking!

Dessert Desires: Carrot Fudge

Sweet cravings after a meal run in my family’s genes it seems (And no, thankfully it doesn’t translate into diabetes). Its not just my family, on asking some friends educated me of the fact that most people crave a sweet dish after meals. And specific to our home, we usually keep the Agra ka petha (the city of the Taj Mahal, Agra, is famous for this), a packet of Fox’s sweets, cream wafers, etc. as the after dinner saviors.

But this time I came across this yummy and nutritious recipe of Baby Carrot Burfi (Read: Carrot Fudge) by TasteBuds and decided to make these to satiate my family’s dessert desires for atleast a week.

These turned out to be absolutely sumptuous and I would certainly recommend this recipe. It’s easy to make and the results are in front of you!! 🙂

Baby Carrot Burfi

Its made with carrots, full cream milk, sugar, khoya (condensed milk, in the form of  tough milk block), ghee (clarified butter), cardamom powder and nuts for the garnish.

The milk is brought to a boil and grated carrot is added. The mixture of milk and carrot is cooked on a low-medium flame until the milk gets absorbed by the carrot. This step is followed by adding sugar and khoya. I used negligible amounts of ghee, to lower the fat intake and also because khoya on heating starts leaving ghee, enough to provide the required greasing. Finally, cardamom is added and the fudge is set in a tin box and garnished with nuts. I used almonds and cashews. Once cooled, the fudge is cut into squares to give the shape of Burfi. The sumptuous carrot burfis are ready to eat.

Thank you TasteBuds, this recipe will now be a constant on my favorite homemade desserts list.

P.S.: For complete recipe, you can visit Baby Carrot Burfi on TasteBuds.